


This is a guide on how to use SourceTV demos when making clips. No further intro, let's get right into it.
Part 1: Why?
There are three main reasons why one might want or need to use SourceTV when making a clip:
-
You weren't recording gameplay as it happened due to a technical error, to avoid poor game performance, or for some other reason
-
You were recording, but your point of view didn't properly show the funny moment
-
You want to show something, but your point of view includes a micspammer whom you want to mute either due to copyright or voice chat audibility
Part 2: Preliminary Setup
There are some things that I like to do when using SourceTV demos in my clips.
First, I made a special .cfg file that, when executed, inputs some commands that make using demos easier. Make a new .cfg file in tf\cfg and copy+paste the following in it:
Line-by-line explanation:
Additionally, I use some custom mod folders that let me disable various things that are detrimental to recording from demos (e.g. I can disable everything but chat and the timer if I wish):
-
Disable general HUD elements
-
Disable HUD elements related to objectives
-
Remove (probably) all Administrator voice lines
Download them here: Download
All three folders can be used independently of each other. More information on the first two is included in readmes that come with the files. If you can't be bothered to learn them, cl_drawhud 0 or cl_hud_minmode 1 are acceptable substitutes.
Part 3: How to Open a Demo
-
SourceTV records every game that's played on Castaway. At 7:00 AM in the server's time zone, the demos are uploaded to a public Mega folder which can be accessed here.
-
Navigate through the folders for the server, year, month, and day you were playing, then download the file for the demo that matches the map you're looking for.
-
Once it's downloaded, you'll need to extract the demo from the .zst file it's in. 7zip should work, and I haven't had any issues with WinRAR.
-
From there, navigate to TF2's \tf folder, and put the demo in there.
-
Open TF2, press Shift+F2 to open the demo playback UI, click "Load...", and double-click the demo you just downloaded.
Part 4: Using the Demo Editor
Once you're in the demo, if you're using the spectator config file mentioned in Part 2, execute it with the command "exec [whatever you named your cfg file]". In addition to the controls added with the special config file, press Shift+F2 to toggle the demo player's visibility.
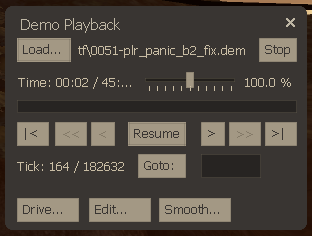
Here is an explanation of what each functional button in the demo player does:
-
Load: Open the demo load menu.
-
Stop: Stop demo playback and return to the main menu
-
Playback speed slider: Change demo playback speed. Ranges from 0.2% to 600%. For more precise speed control: demo_timescale [number]
-
|<: Restart the demo.
-
Pause/Resume: Pause/resume the demo. Relevant command: demo_togglepause
-
>: Go forward a few ticks.
-
Goto: Skip to a particular tick in the demo. Relevant command: demo_gototick [tick number]
Now, you might be asking, "What the hell is a tick?" It's not actually that complicated. A tick is basically a snapshot of everything that's happening on the server: where players and entities are, when people do things like fire weapons, etc. There are 66 ticks per second, or 3,960 ticks per minute. An average 45-minute demo has around 180,000 ticks.
The rest of the controls should be familiar if you've ever spectated before. Spacebar to change point of view between first-person, third-person, and freecam; left-click and right-click to change which player you're spectating; move mouse to look around in third-person and freecam; and WASD to move around in freecam. Unfortunately, you can't move in freecam while the demo is paused, so all camera positioning has to be done while the demo is playing. Additionally, movement speed is tied to playback speed (move faster when demo is played faster, slower when demo is played slower).
When searching for the part you want to clip, there are two methods:
-
If you remember what the map timer was at when the moment want to clip happened, you can skip right to it with the Goto feature. For example, if the map time left was 18:00 when what you want to clip happened, you can skip to tick 102,960 (26 [minutes into the demo] * 60 [seconds per minute] * 66 [ticks per second]; skip to a minute before so there's time to set up your camera + avoid certain issues). From there, you can start recording.
-
If you don't remember, your best bet is probably to just go to your POV and watch the demo sped-up until you get to the part you want to clip. Once you get to the part, rewind a decent amount (I'd say about 1400 ticks, maybe more if you need to), and start recording.
Once you have your recording, just trim the start and end as necessary so there isn't any dead air, export the recording, and your clip is good to go.
Part 5: Using SourceTV Demo Recordings with Regular Recordings
This part is relevant if you want to use both types of recordings in the same clip (example here). It requires a video editor.
To do so:
-
Open the SourceTV demo and find the part you want to record.
-
Record it, making sure it's at least a few seconds longer than what you need; have some room for overlap with the POV recording at both the start and end.
-
Export your recording.
-
Open your video editor and insert the clips.
-
Look for a visual cue you can use to sync the two clips. Find where it is in one recording, and mark it. Personally, I like to work with the POV recording first, and then splice the SourceTV recording into it later. As an example, I usually use the round timer ticking down to a specific point in the POV recording as a cue, marking the first frame where the timer shows a certain second in my POV recording.
-
Look for the corresponding point in the SourceTV recording and line it up with the marker from the previous step.
-
Replace the part of the POV recording you wish to replace with the SourceTV recording.
Part 6: Muting Players in SourceTV Clips
This part is almost entirely copy+pasted from a guide I made last November.
Recording Gameplay
When a clip I want to make has someone I have to mute (usually a micspammer playing annoying/copyrighted music), I make two types of recordings for it: gameplay recordings (just the gameplay) and voice chat recordings (just the voice chat). I make sure all of my recordings start and end at roughly the same time and that none of them leave anything out.
When I record the gameplay itself, I use "voice_scale 0" to disable voice chat while still keeping the indicators at the bottom right.
Recording Voice Chat
Once the gameplay recordings are done, I go back through one of them and create a list of everyone who used voice chat during it.
Some micspammers (type A, example of being muted here) don't talk while micspamming; others (type B, example of being muted here) do. This is an important distiction to know for later.
I have to explain "cl_voice_filter" now. By setting it to a specific string, it will filter voice chat to only players with that string in their name. For example, setting it to "a" means only people with "a" anywhere in their name will appear in voice chat. This is the key to how everything here is possible.
I then go through my list of voice chatting players and use it to determine which cl_voice_filter values I'll need to use and how many recordings I'll have to make.
For type A micspammers, the goal is to record everyone's voice chat except the micspammer's. For type B micspammers, the goal is to have the micspammer's voice chat recording be separate from everyone else's (if anything the micspammer says is worth including; otherwise they can be treated as a type A).
I close TF2, enable SpecHUD Voice (download in Part 2) that removes a bunch of sounds (most importantly announcer voice lines), reopen TF2, and type "voice_scale 1; voice_overdrive 0; voice_overdrivefadetime 0.001" in the console to re-enable voice chat and make it override all other game sounds.
I then set cl_voice_filter to one of the values I planned, and open the demo. Before fast-forwarding, I move the camera far away from the playable area and type "stopsound; stopsoundscape" to remove any remaining sounds.
Now, I can finally start recording voice chat. Once a recording is done, I set cl_voice_filter to another value I previously determined and make another recording. Once I have all the recordings I need, I close TF2 and get ready to edit everything together.
Editing
I export all of my recordings, open my video editor (everything mentioned here should be doable in any editor), and insert the recordings.
Before starting work on the voice recordings, I edit the gameplay recordings to my liking.
Once I'm done with the gameplay, I start adding the voice recordings. The technique differs here depending on the type of micspammer.
For type A micspammers, I just add the voice chatters' recordings, sync them to the gameplay recording by using the voice chat indicators as a guide, and disable the video portion of the voice recordings so only the audio is present.
For type B micspammers, I perform the same steps detailed above for the non-micspammers. For the micspammer, I sync the recording of them to the gameplay like with the others, cut the recording into multiple separate recordings where there's one for each instance of the micspammer talking normally, delete the parts where the micspammer isn't saying anything, and disable the video portion of the voice recordings.
Once the voice recordings are fully implemented, I render the video, upload it, and link it in the thread.